Welcome to my blog

I hope you enjoy reading my posts, and please leave me a comment. I always enjoy reading them, and will try to visit you in return.

For security reasons for me and for you, I would appreciate it if you would leave your name on your comments.

You are welcome to copy any of my designs, as long as you do not take credit for them yourself. I am very happy for you to sell them. If I have used anyone else's design, I always try to give credit where it is due. If I have missed anything, please let me know and I will put things right.


This is intended to be mainly about my crafting stories, as a personal record of what I do. However, I interpret crafting quite widely, not just paper crafting but other things too. I have a butterfly mind and like to change from one thing to another depending on what I feel like on a given day - knitting, crochet, cross-stitch, cards, baking and several others, including my favourite right now, parchment, both traditional skills and Groovi, very relaxing and calming to do.

I have decided to put some structure into my blog so that each day will have something of a theme.
Monday- for Mindfulness; Tuesday - Tidy Up Day; Wednesday - What's on Your Workdesk Wednesday; Thursday - Technique and Tips; Friday - Finish Off Day; Saturday - Start Something New; Sunday - Anything Goes
These themes are not hard and fast and will be changed if I feel the need.

Wednesday 31 October 2012

WOYWW - 178

Why I am showing you a picture of a boring desk top with not a lot to show.  In case you have not heard already, it is just one of around 200 desks on show, courtesy of a very kind hostess, Julia.  When you are bored with this desk, there are loads more fascinating desks to drool over and enjoy if you pop over to Stamping Ground  and follow the links you will find there.


Not too much on my desk again today, really because I am on the home run to finish all the birthday and anniversary cards for 2012.  That really worries me, 'cos it feels as though this year has totally vanished without trace and at great speed.  I cannot believe that we are so close to Christmas, and I don't remember summer.  Is it just my age or does anyone else feel the same?

The last four cards were quickly done as they were mainly standard computer generated cards, mainly to cut down the cost of postage.  Even if they are based on CD images, I always try to make them different in some way, to try to show that I am thinking of the people involved. 

You can see my heat resistant mat on top of my self heal mat.  Underneath all that, but hidden is my precious Splodge Away mat, which really does the business.  If I could fit it in, I would have the A3 size, but sadly I have to be satisfied with the 12 x 12 mat.  Really, it is quite big enough to do whatever I need.  I can't believe how much paper and ink I am saving by using it, and the ink is still useable two or three days later, so you can do several projects along the same colour lines, without having to remix.. 

To change the subject and finish, I hope all of you out there, your friends and families are all safe and well, especially all those in the path of that horrendous superstorm.  Our nephew is just outside Philadelphia, but is fine so far, apart from expecting to lose power, which apparently happens a lot round there.  Keep safe, everyone, and keep in touch.  

Talking about keeping in touch, did you hear that WOYWW was being talked about on local radio on Merseyside this week.  Fame at last, Julia.  Hope lots more crafters come to join us as a result.  Please leave me a message so that I can come round to see you later.

PS I found my missing labels today.  Now what else have I lost..... Oh yes, has anyone seen one of my small Really Useful Boxes that fits in the little unit on the top of my shelves.  I know it is around somewhere.

Tuesday 30 October 2012

Pixie's Craft Snippets - Week 45

I have been MIA for some weeks now, due to the need to finish all the cards for the rest of this year, and my DT commitments, but this is one of those cards that actually used up bits that were lying round. It is a mix of bits from everywhere.

The base card was cut down from a set I bought cheap ages ago, and they do look a little dog-eared now (nothing wrong with dogs' ears, but not on a card), so I just chopped off the raggedy bits.  The sparkly bits were stickers left over from a kit I bought several years ago.  They are one of the reasons I no longer buy kits from anywhere, you always end up with pretty bits that you have no idea how to use.  I sometime think that kits are made up of things that companies are trying to clear out anyway.  These stickers certainly did not go with anything else in that kit.  The cards were pretty, the borders were pretty and the stickers were pretty, and so were the 3 dimensional flower stickers, but none of them really went together.

Anyway, I also had a pack of pearlescent card samples which had started to haunt me - they always seemed to be on top of every pile on my desk.  So, in a moment of diminishing mojo, I decided to put the two things together and see what happened.  The resulting topper was mounted on a scrap of black card and then on to the base card.  It is not a card that I am particularly proud of, but it is using up things that would otherwise sit around for another year or more.

Before I finish, I hope that all of you on the east coast of America and inland from there are all safe and sound, and that anyone you know out there comes through this dreadful storm safely.  Property can be replaced but your lives cannot.  Take care, everyone.  xxx

Sunday 28 October 2012

Craft A Scene - Majestic Mountains No 2

This is my second offering for the Craft A Scene Challenge blog.  This month's theme is Majestic Mountains and this mountain is truly majestic in real life.  I just wish the temperature today was as good as it was when I took the photo that this card is based around.  We might have had sun today, but it is freezing, and my finger tips got frostbite while I was down in the greenhouse getting things emptied for the winter.

Many, many years ago, I went off to France to stay with my French pen friend for three weeks.  I flew from Heathrow to Paris, expecting to be met by my pen friend and her family, get on a train and head off for Nantes, where they lived.  Instead, I was met just by her father, whose English was non-existent.  He worked for the French National Railways (SNCF) so travel on the trains was free, so I was not surprised to head for the Gare d'Austerlitz.  However, I soon realised that we were not going to Nantes but, instead, were heading much further south.  At some stage the engine was actually changed for a steam engine, and we had to change trains at Toulouse to get to Narbonne, where we were met by my pen friend.  From there, it was a local train and bus up the Pyrennees to Vernet Les Bains, where the family had booked a flat in the main square for Easter.  We had a wonderful time there with quite good weather.  My pen friend, her two sisters and I were free to walk in the foothills, even getting right up to the snowline of Mont Canigou.

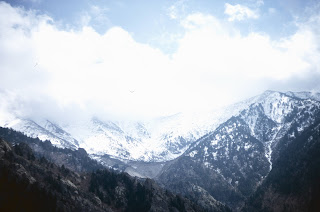
My original photo was taken one evening at sunset, and is actually far more dramatic that my interpretation.  The basics are there, the fantastic sunlit snow covered peak of Canigou, the folds of the surrounding mountains, and even the building to the right.  However the mountains were far darker, but when I tried to replicate that, it just looked an evil mess.  That was when I decided that I had to start with just the shapes, which I drew in lightly in pencil.  All the colouring in was done with Derwent watercolour pencils and my trusty water brush.  The vividness of the peak was difficult to portray.  I used several thickish layers of white, and then added highlights in quite a bright orange,blending it in.

The trees were two different stamps from Clarity, stamped in Adirondack Bottle, with quite a lot of masking to achieve the smaller trees in the distance.  The birds came from one of the Hobby Art sets.  So all my stamps were easy to place, all being clear, see through polymer.  I started using the burnisher all over and realised VERY fast that ordinary graphite pencil smudges under the burnisher, and I had drawn in the tiles in pencil.  So I had to leave the roof of the cottage unburnished.

Normally, I use quite a narrow border, but I thought this time that a wide black border would suit the image better, and kept it simple by mounting on to plain white pearlescent card.

This is the photo with which I started, and I hope you think I did it some sort of justice.

Spectacular or what?  Mt Canigou at sunset.

 Although we were there for 10 days, this was the most dramatic shot I got.  As you can see, from the next two shots, luck played a great part.

Good shot, but definitely second best

Then, of course, there were the times when the clouds came across -

Not to mention the times when it vanished completely in the gloom

We had a great time up in the mountains, and I always wanted to go back, but I suspect I might lose the magic from my memories if I did.  Still I have my photos to look at and to use.  Hope you like them, and the card they inspired.  I just hope it might have encouraged you to creat a Majestic Mountain scene for this month's Craft A Scene challenge.

Friday 26 October 2012

More water colouring

Why is it that when you photograph a card, it never looks straight?  The card is straight, but this photo seems to have distorted it it slightly.  Never mind, you all know these problems.

This is the card I have done for our daughter's 40th today.  Now I have had a tidy up, I can get to my watercolour pencils more easily, and there is room on the desk to put the case.  With that in mind, they have figured more in  my more recent cards.  All the stamps used came from a mixture of Hobby Art sets, which do work together well.

I did drop one clanger, though.  Knowing I was going to colour with watercolour pencils, I should have used a permanent ink pad, but I just grabbed the nearest which was the Adirondack.  Bother!  OK, then, change of plan.  No water, just the colour and a bit more careful blending. 

I needed to extend some of the lines to join stamps into a cohesive image, but most of it was just suing stamps carefully.  Being clear stamps makes things so much easier to position things.  I use the Clarity mounts for all of them as they are light and easy to manipulate.  I also needed to extend the road/pathway in both directions, keeping the right perspective.

While I was tidying up and moving things around last week, I decided to put all my Derwent things together, and realised that I had the blender and burnishing set.  I used the burnisher on this completed scene, and was delighted with the result, a smooth protected surface. 

This is one card that I actually trialed on scrap paper before actually going for it.  With so many small stamps involved, I think it was a wise move.  It did end up roughly as planned with a couple of slight adjustments.

We went over to Webbs Garden Centre yesterday morning, (one of the biggest in the Midlands) to have a look at their Christmas stuff.  Didn't get any Christmas things, but did manage to get into Hobbycraft, who have a large presence there.  Surprisingly enough, there really was not a lot that made me want to spend, apart from pencils, paint and that sort of thing.  I had to keep my purse firmly closed there.

Wednesday 24 October 2012

WOYWW - 177

I hate glue ......I hate glue ....I hate glue  .... with a serious passion.  Sorry about starting with a moan but I have just spent two hours scraping at, spraying, scraping some more, spraying more to remove a complete can of Stick and Stay from my cupboard top, not to mention all the things around it that were contaminated.  For some reason it sprang a leak and I had not noticed until I decided to have a move around, went to move my Fiskars shaped scissors and found they were well and truly stuck.    One can of Spray Away, half a kitchen roll, and most of my nails has finally removed it all.

Having finished my moaning, I must get to the point of this post, which is to take part in the best blog hop of all.  It is called What's on Your Workdesk Wednesday - WOYWW, and is hosted by the very clever Julia at Stamping Ground.  Do pop over there and take a look at the amazing desks exhibited by friends from all over the world, showing their work, their workspace and beautiful photos and ideas.  When you have had a look, we would love you to leave us a little message so that we can return the call and make friends with you as well.

As a result of my sticky crisis, I have done no crafting at all today, although I have 11 cards to do in a hurry for myself, and three cards to do for the December Craft A Scene.  Mind you, I probably could not show you any cards even if  I had done them, as they are either for future publication or for people who might see them before they open the real thing.

I am in process of reorganising things in my room, to put the things I use very frequently close at hand, and to label boxes with what is actually in them, not what used to be there.  No wonder I can't find things (my labels are still AWOL).  By the way, does anyone have any clever ideas on what to do with all the original tops from Promarkers when  you have replaced them with the fine tips - I have dozens, and like a true crafter, I feel that there must be a good use for them rather than to just bin them.

This is actually a scheduled post, as I shall not be fit to write anything up on Wednesday morning and I am hoping to link up a bit earlier this week, perhaps before I get to bed.  I also hoped that I could get a photo without flash, but the daylight is just too poor today.  Roll on Spring, although given my advancing years, perhaps I should not wish any part of my life away.  Must make the most of every second.  I reckon care homes will have to change to accommodate us with our computers, internet access, wifi technology and our large crafting stash.

Hope to see you all later as I wander round your desks.  Have a good week.  xxx

Wednesday 17 October 2012

WOYWW 176 - Not a lot to show

If you have arrived at this post by wandering round the internet and are wondering why on earth I should be showing you an almost empty desk, it is due to a lovely lady by the name of Julia who started it all.   WOYWW stands for What's on My Workdesk Wednesday, and is regularly visited by around 200 each week, so there are plenty of desks to drool over, gasp at in horror and generally mooch around.   There is not a lot to be shown this week on my desk, partly because I have just finished one project and about to start another.  Another reason is that a lot of the things I have on the go are destined for publication in future weeks, either as a new member of the DT for Craft A Scene, some things for other challenges, or for friends later in the month.

I can show you this one card which I did for a Clarity Stamps Club challenge for August.    As far as I can remember, the brief was to use a carol, a star and gold and black.The carol was printed in reverse on acetate (if you don't print in reverse, it will backwards on the finished  image), then I sprayed the back with adhesive before applying gilding flakes.  Once it was burnished, I mounted it on gold mirri card, the on to black Clarity card.  

The star was a Clarity stamp, which I printed twice on to the reverse of the gold mirri card,  I cut one out, following the lines exactly, while the second was cut oversize, so that I could decoupage them ti give a bit of dimension.    The three wise men were also from Clarity, but were stamped using second generation ink to avoid slipping on the pearlescent card, then I brayered over them to attempt a look of desert sand.  I followed the theme onto the insert, continuing the carol, star and wise men.  Again I used the brayer around the edges. 

If you have seen enough here, do go over to Julia to  some of the other desks on show this week.  Please leave us comments, we love to read them, and we will come over and visit you in return.  See you soon.


Sunday 14 October 2012

Delayed anniversary card

As some of you may already know, Shaz Silverwolf is our daughter's mother-in-law.  She and her husband went off to Paris last week for their anniversary celebration.  I am not jealous  ... not one bit ....just rather a lot!  I spent so much time there when I was a lot younger, and have lots of good memories and so many photos.  The thought of Paris brings back smells - fresh bread,among many -and memories of friends I have not seen since I left school.  I won't tell you how long ago that was.

Anyway, back to the card.  I had already almost finished a card for Shaz and Doug before I heard where they were going.  Then I knew I had to change tack, and went hunting through all my old slides to find what I thought would go together.  Most of them date back to a trip one Easter.  A group of us from our school had joined a much larger party of people from schools all over the Midlands to the Lycee Lakanal just outside Paris.  We had lessons in the morning and then were supposed to go on organised trips in the afternoons.  We must have been most annoying to the organisers as my friends and I used to "get lost" somewhere in the Metro and go off and do our own thing.  We always turned up at the right time back at the Lycee in time for the evening meal, so in the end, they gave up trying to hang on to us.

Obviously, one of our visits was to the Tour Eiffel.  This photo is not doctored.  The light was so incredible and dramatic.  Needless to say, we had a tremendous thunder storm just after it was taken, by which time we were in the lift going to the top of the tower.  In those days, you could go higher than you are allowed now so the view was phenomenal.  

This second picture was taken looking towards the Place de la Concorde, and is showing signs of age, turning slightly mauve-ish., but I quite like the effect.  

These are the two photos I chose to work with, mounting them digitally across each other, then mounting the whole thing onto black card, and filling the rest of the border in with black Promarker and ruler.  The  background paper was created using the Splodge mat.  I used three toning colours, to reflect the colours of the photos, and blended then as I wanted on the mat, then used the brayer to transfer the colour in three blended stripes to a sheet of Clarity coated paper.  I cut a length of cling film, misted it with water and scrunched it down on the top of the coated paper, and scrunched it a bit more, left it to dry, and then buffed it up with kitchen roll.  

Once the background was dry, I moved the topper round on top to decide where it looked best, cut the paper to fit an A4 piece of white pearlescent card and glued it down with Crafters Companion Stick and Stay.  I added the topper with Pinflair glue to allow just that little extra bit of maneuverability.  To finish off, I coloured a peel-off sentiment with the Dufex pens, and added two little groups of gem hearts.  

I would suggest that you might like to slip over to Shaz's to see some of her photos and hear what she has been up to on their trip and on her return via Dover.

Craft A Scene - Majestic Mountains 1

Hi folks, this is my first post as a newbie member of  the Craft A Scene  DT, and the brief was to create a project with the theme of Majestic Mountains.  This is my first offering, and sent my brain into overload, trying to decide how best to achieve my ideas.

Recipe:-
Supersmooth white card
Stampscape mountain stamp
Clarity stamps - castle, moonshadow,and small fir tree
Hobby Art stamp - bird
Adirondacks - Pitch Black, Slate, Cloudy Blue, Juniper
Big and Juicy - Sunset
Speedball brayer
Splodge Mat
Make up sponges
Derwent watercolour pencils

The first problem was to find the right mountain image.  I wanted a whole range of mountains, so I did quite a lot of masking and then stamping over the masks with the Stampscape stamp to achieve multiple peaks.   I create the masks by stamping several times on to the sticky edge of a Post-It-Note, then cutting out as many as comfortable with the scissors - after all, cutting out is the pain so it makes sense to cut as many as possible in one go.  (Cut them so that they are fractionally smaller than the original image, which helps to avoid a white halo around your stamped image later in the process)  

As with all stamping, I stamped the front image first, then masked that off and stamped again in a different position.  I repeated that process until I had the mix I liked.  I used Adirondack Pitch Black for all the stamping, and for the mountains, which I wanted to be slightly faded  into the background, I stamped first on scrap paper before doing the final image.  I had also cut out a copy of the mountains on a piece of copy paper, and used that as a mask while I brayered the sky.  At this point, I dug out my trusty Hobby Art stamp of the bird of prey, and put that in just above the mountains, making sure it was a good dark image - first generation ink - as it needed to look as though it was in the foreground.

The sky was the point at which my wonderful new Splodgeaway Mat came into its own with a vengeance.  I masked the mountains, the bird and the sun, and started with Cloudy Blue on the brayer.  I kept going back to the mat to reload the brayer until I had the level of colour I needed.  Then I added a little purplish colour from the Big and Juicy in pad in the corners. 

The castle stamp is from the Clarity Stamp range, which as quality photo polymer stamps, makes it possible to place them exactly in the right place.   I was going to place it on the edge of a lake, but I did not like the lake when I had done it, so I just chopped that bit off.  Then it was back to Clarity again for the small fir tree, which I used to try to blend the mountains and the lowland together without too much of a hard edge.  I used the tree with mostly second and third generation ink so tha I got some sort of idea of perspective, pushing some right back into the background.  I also masked the base of the tree with a piece of copy paper so that I finished with trees of differing sizes.

To ground the trees and the castle, I used  Adirondack Juniper on a make up sponge just to dab colour very lightly.  Yellow on a make up sponge was also dabbed lightly for the sun.  The shadow round the moon was another Clarity stamp, a very useful one.

Once all the inks were thoroughly dry, I used a green Derwent watercolour pencil, just as a dry pencil, to add a little colour to mountain meadows.  The only other addition I made was a bit of glitter, with a Quickie glue pen, allowed to dry and then sprinkled with Martha Stewart fine glitter, just to highlight areas of the mountains and the castle.  As usual, the glitter does not show up on the photo, but it is there, honestly.

To finish the card, I trimmed the topper carefully, watching to see whether I was happy with each cut, and mounted it onto black card with a very thin border, then onto an A4 piece of white pearlescent card.  I was not sure if I need to do more, but when my husband said he really liked it, I decided it was time to leave well alone.

I had a quick look at the card from another of the DT, Sally , who, quite independently, has used the same buzzard image from Hobby Art.  Great minds think alike, but still produce very different results.  Nice one, Sally.

I hope you like it as much as my husband did.  I am looking forward to showing you more of my projects during my time on the DT.  Come and join us over at Craft A Scene and see what you can do.  Can't wait to see your pieces of work.  We have a different theme each month, so come on and have a go.

PS My  husband read this post and pointed out that there is a language problem between the UK/Europe and our friends in North America concerning the name "buzzard".  If you want to read the info for yourself, just go to the Britannica version.  The buzzard Sally and I have used in our cards is the Common Buzzard (Buteo buteo) and is not found in North America.  OK, that is the end of the lesson for today.

.

Wednesday 10 October 2012

WOYWW - 175

Still reasonably tidy for the second week in a row.  I have been very strict with myself and tidied up after every session or when each piece of work is finished.  I am sorry that there is not a lot I can show you this week on my desk.  That is because I am working on my contribution to the Craft A Scene Design Team for this month, and they must remain hidden until they go up on the website later this month.  I was very proud to be accepted onto the DT and I just hope that my offerings will be good enough to give others ideas on what they can do with what they have.

My desk is set ready to get busy tomorrow, hopefully, on my second project, so the brayer is out and the Splodge mat.  The papers are a mixture of masks and photos that I am turning into line art to use as digi stamps.  They are my own photos so there is no problem with copyright as that all belongs to me anyway.

This week has been a time for losing things and finding them.  There was something I had lost last week, but I cannot remember what that was.  Anyway, I found it.  Then I moved my Melt Dust and the papers to go with them from the sensibly labelled drawer to what I foolishly thought was a better place.  You've guessed it - I lost them all.  Then I needed my posh tracing paper to do the line art from the photos.  Could I find it - nah!  However, hunting for that, I found the Melt Dust stuff and more I had forgotten all about.  I also found my A4 plastic sleeves, and my cello bags.

Then I needed to move my shrink plastic, and there was the tracing paper.  Result!  The only problem now is has anyone seen my mini labels, the ones I picked up and moved yesterday?

Do share tales of what you have lost and found recently.  Those of us who get together with Julia at What's on Your Workdesk Wednesday would love to hear your stories.  See you over there.  Do join us.

Monday 8 October 2012

Hobby Art - Brilliant company!

I know I have already shown you these cards, but I do have a valid reason for showing them again.  The stamps are from a British company called Hobby Art, who produce a lot of scene sets of stamps.  They are small stamps and excellent for mixing with other stamps to create pictures.  So far, I only have two of their sets, the Countryside set and the Tuscany set, but I really like them.

Consider my horror yesterday when I went to the box to dig them out and found that they had almost "melted".  I was desperate to use the bird from the Countryside set, and did just manage to keep it in one piece long enough to get an adequate image from it, before it fell into several pieces.  Looking at the others in the two sets, they were all falling to pieces.

I immediately contacted Hobby Art and explained what I had found.  I had a very swift reply from them, in which they said they were replacing both sets straight away.  There had been a problem in the manufacture some time ago, which had only just started to show up, so they could not contact me.

We often moan and complain about poor service, and poor quality, so I think it is very important to shout about really good service and quality when we come across it.  I was very impressed with the friendly and helpful manner from Hobby Art, and I will definitely buy from them again, and would recommend them to all of you.  Thank you, Jenny, for your help.

Friday 5 October 2012

Lesson time!

This is the table ready for action, with all the stamps I thought we would need laid out, all ready mounted (I do listen to Barbara Gray), ink pad in place, copy paper for practice and design, and baby wipe box for immediate stamp cleaning.  Organised or what.  Out of sight to my right is the big grey box with everything else needed for later stages.

Still fairly tidy, having got to the next stage.  We have worked through the copy paper bit - I would have liked to do more of that really, but I wanted to make sure my friend had a finished card to take home with her.  In this shot, she has transferred her design to the Clarity silk card, made sure it was dry, and is now colouring in with Promarkers.  She does not possess as much stuff as I do, so I very deliberately limited the equipment to the bare minimum.  For example, I only gave her 6 Promarkers and four ink pads, including the black for stamping (see the list below for our list of things).  The mauvy stuff is my new low tack tape (I had run out of tape), which is holding the Clarity card onto the backing of copy paper, and also giving a sharp clean border.

This is the final result.  We brayered the sky with Adirondack Cloudy Blue and just a touch of a more purply hue from a Big and Juicy - her first attempt at that technique, which went remarkably well, partly thanks to the Splodge mat (I love that thing).  Because she does not possess a brayer or a Splodge mat, the ground and the hills were done in a very low tech way, with a torn piece of paper and a make up sponge using Adirondack Juniper.  The hops would have benefited from a little more time spent getting a bit more depth and shape, but we needed more time and different lessons for that.  The background was created using the cling film technique on Clarity silk paper, and the Cloudy Blue and Juniper so that everything matched.

For a first go at most of the techniques, I think she did remarkably well, and should be very proud of her achievement.  It did help that my black ink pad is starting to run out so the stamps did not slip too much on the shiny surface, but she did well with the tree shadows too, using second and even third generation ink to get the faded look.

This last photo proves that it does not take too long to completely lose a large green cutting mat.  I suspect it will take me most of the morning, at the very least, to sort everything back into the right place and then I can finish my card (on the table).  Then I must find that melt dust, and all the other things people have asked me to look for, like tweezers and washi tape (What is that - must look that up).

I think I was reasonably well organised for this first attempt at teaching these techniques (probably more organised than I was when I was teaching full time), and I was very pleased with the results my friend got.  We had a three hour session, with a drink break, and managed to create a completed card (apart from gluing the topper into place which she will do at home).  Well done, girl!

What we used:-
copy paper
Clarity silk card
Clarity silk paper
Clarity Oast House Kit with trees from the Waymarker set, and birds from the Harbour Kit
Adirondack - Pitch Black, Cloudy Blue, Juniper, Stonewashed
Big and Juicy - Soothing Sunset
Promarkers - Satin, Sandstone, Blush, Soft Green, Pastel Yellow, Lime Zest, with Slate to do the edges
Speedball brayer
Splodge mat (12x12)
Mist spray
Make up sponges
Kitchen roll
Cling film
Post it notes for making masks
Crafters Companion Stick and Stay
Pinflair Glue Gel


My Beautiful Tree

This tree is the one I can see from where I sit in my craft room.  It is a liquidamber and is a very good guide to the seasons.  Normally, it is all brilliant red by now and starting to drop its leaves.  in fact, the last couple of years, it has turned completely by the end of August.  This year, however, it has only just started to go reddish, so autumn is at least one month later than last year.  I will take other photos as things change and post the best.  How is your Autumn going, or Spring if you are down under.

Wednesday 3 October 2012

WOYWW - 174

I cannot remember when I last saw the whole of my cutting mat, but it is a long time.  Not only that but I have actually put away most of the stuff that usually lives there, in fairly sensible places, although I have now lost one complete batch of melt dust. and the papers that go with it.  I do have faith that it will turn up.  Anyway, this clear state of affairs did not last very long, as I now have all the things I need to teach a friend on Thursday.

I now have a large tray in situ, containing all the things I need (I hope), but she is coming to me son it will not take too long to find anything I have forgotten - as long as I do not need the melt dust.  These photos were taken about 17 minutes after midnight so I think they count as Wednesday.  We shall be working with the Clarity Oast House kit, and trying different methods of colouring and creating the background.  If you look, you can see my crib sheet that I have worked with today to give us a start.  I was not too sure about the correct colour of hops so I downloaded a picture  and printed it for our use. 

You might also pick out the ink pads ready and the Splodge mat for use with the brayer.  I also dug out just 6 Promarkers.  I want to keep the palette simple and very limited.  We shall also have a go with a make up brush, and sponges to get the background right.  I hope it all works out and my friend has fun, which is what it should be all about. 

I am off to bed now, but I hope to meet you all at Julia's Place for a coffee and a nice piece of cake maybe a bit later, and a wander round to see what you are all doing this week.  See you soon.  xx