Welcome to my blog

I hope you enjoy reading my posts, and please leave me a comment. I always enjoy reading them, and will try to visit you in return.

For security reasons for me and for you, I would appreciate it if you would leave your name on your comments.

You are welcome to copy any of my designs, as long as you do not take credit for them yourself. I am very happy for you to sell them. If I have used anyone else's design, I always try to give credit where it is due. If I have missed anything, please let me know and I will put things right.


This is intended to be mainly about my crafting stories, as a personal record of what I do. However, I interpret crafting quite widely, not just paper crafting but other things too. I have a butterfly mind and like to change from one thing to another depending on what I feel like on a given day - knitting, crochet, cross-stitch, cards, baking and several others, including my favourite right now, parchment, both traditional skills and Groovi, very relaxing and calming to do.

I have decided to put some structure into my blog so that each day will have something of a theme.
Monday- for Mindfulness; Tuesday - Tidy Up Day; Wednesday - What's on Your Workdesk Wednesday; Thursday - Technique and Tips; Friday - Finish Off Day; Saturday - Start Something New; Sunday - Anything Goes
These themes are not hard and fast and will be changed if I feel the need.

Wednesday 29 February 2012

WOYWW - 143

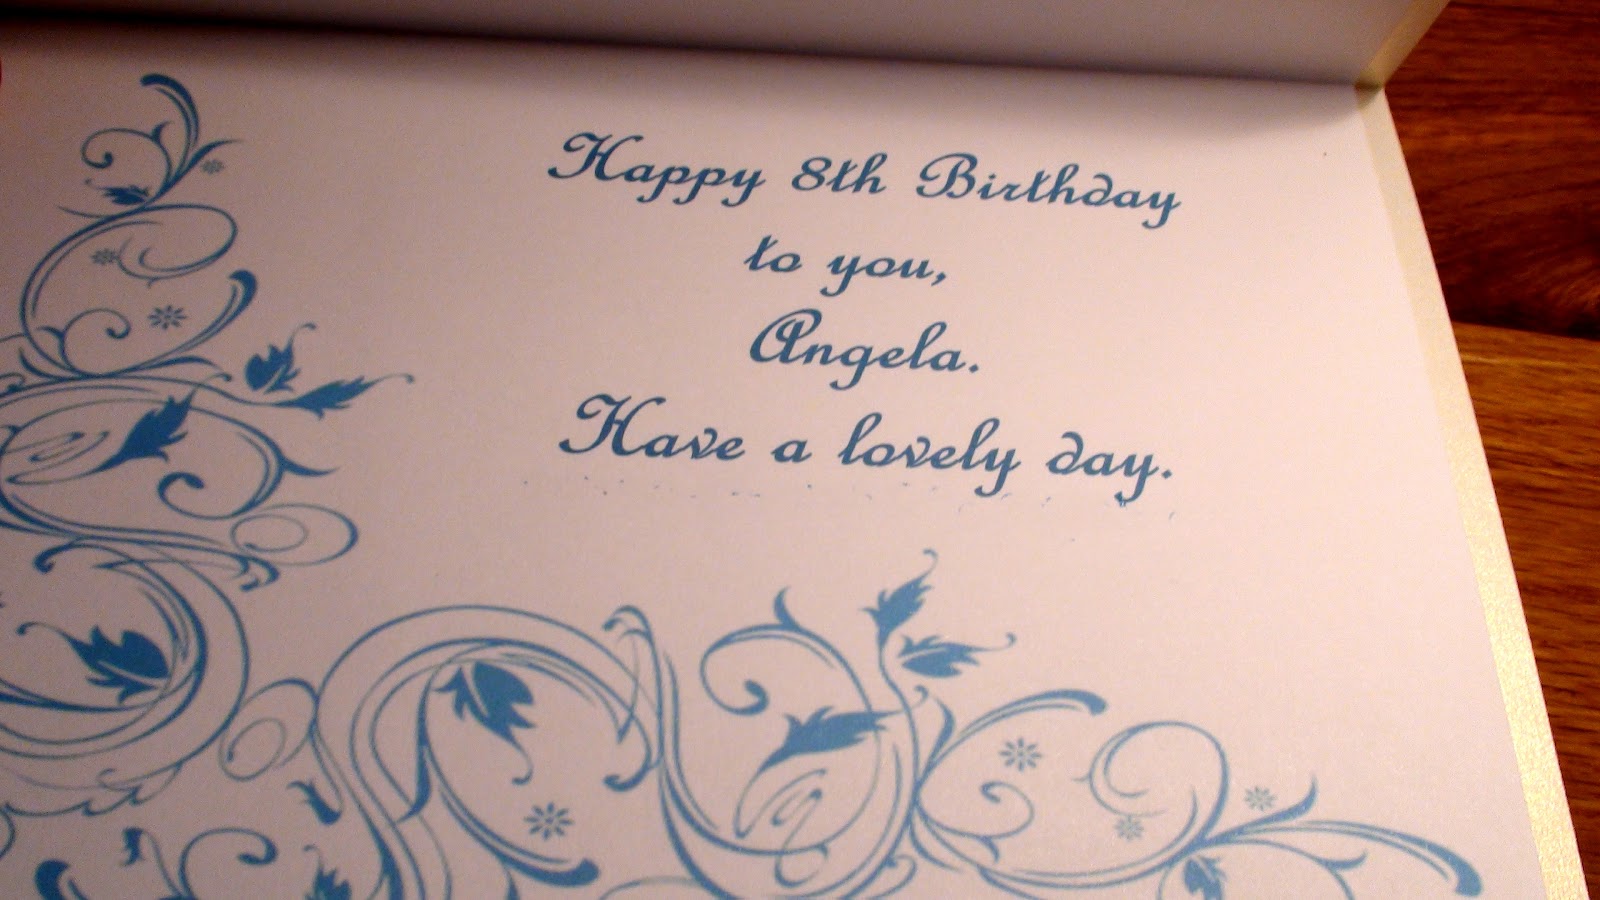
These photos  are really just a continuation from last week, for the simple reason that nothing new has happened to my desk, and the cards I have not shown you so far are to be hidden for another couple of days, until they have been delivered and opened.

The clipboard on the left contains my birthday and anniversary lists for about 6 years, also showing, in red,  how many years they celebrate. Underneath that list are all my labels that I stick on cards, and all the address labels I need for the year (apart from Christmas).  Printing the labels once a year is far easier than hunting for addresses every time I want one.  I do a separate list for Christmas, which also gives me a quick check to see if I miss anyone.  If the label is there, then I have not sent a card

While I was sorting things our last week, I came across several things I had lost or forgotten about, including several lots of pencil items.  I had forgotten I even had the set of Burnishers and Blenders for the Derwent Watercolours - very useful bit of kit those.  Above those are a set of Lakeland pencil crayons - not watercolours, but just basic standard crayons like I had and loved as a child, with all my very favourite colours in.  I had to have those just for reminiscing, the sky blue was always my favourite.  Across on the right are my very useful Dufex pens - not sure if they are still made, so I may have to check those out.  They are brilliant for colouring peel offs to suit whatever I need and also gems colour in well with them.  

You may also notice my tiny spring type scissors, and the packet next to it is for my crafting tweezers.  If the packet is there, then the tweezers are on my desk and need to be put away at the end of the day, before the Borrowers pinch them.  

There has been a serious lack of crafting today, for family reasons.  Our son, daughter in law and the two girls came down from Derby for the day to wish my DH a happy birthday for tomorrow, Leap Year Day.  So we have had a great time singing nursery rhymes and singing songs and playing with old and new toys.  My snoring Bagpuss and Janiemouse (one of the mice on the mouse organ who sings) were a real hit and so was the little yellow kangaroo with the joey in her pouch.  Something totally new that you cannot take home is always a hit.

As there are not cards to show you, I thought you might like to see one of the cross stitches I did for a wedding sampler a few years ago.   This started off as an A4 size picture with the usual basic sampler things on until my DH suggested that it would be nice to put in things that were special to them only.  So then there was a working narrow boat (belonged to the bride's parents), their own yellow Land Rover, a Springer pup (theirs), a mountain bike for him, a dragonfly (she worked on the Dragonfly project for British Waterways), the obelisk at Eastnor Castle (where they got engaged), and the church at which they were getting married.  The centre was going to be just the usual doves, rings etc, until someone told me that the bride had expressed a wish that someone would give them a cross stitch of Eastnor Castle (anyone with Land rovers will know that Eastnor is the spiritual home of the marque).  so. with four weeks to go, I set about adding the centre oval with the castle in.  It was all done by converting photos, and working on fine linen with one thread going over one stitch at a time, I wish I had had my Ottlite then.  As you can see, it was not A4 when it was finished, but they seemed to like it.

Now I am sure that Julia is waiting for you to sign in and move on to the next blog in her group.  I had quite a good mooch last week, although I was miles away from getting all round.  Apologies to those I missed and thanks to all who came to see me.  You are all very welcome at any time.  I do have one personal little niggle though about the dreaded Word Verification problem.  It does slow us all down seriously, meaning we get round to even fewer than we would like.  I did persist through them although a lot are really hard to read, but I know that many people give up as soon as the Word Verification pops up.  I found it was easier just to check all messages before publication, rather than use the Word Verification.  If you want to see what I mean have a look at the http://allsortschallenge.blogspot.com/ , who are asking everyone to turn it off as they will no longer work through it and they are not the only ones.   What you decide is definitely up to you and should be whatever makes you feel most comfortable.  In the meantime off you go to Julia's and I hope to see you all later.

Happy Leap Year Day.


Friday 24 February 2012

Pixie's Snippets Challenge and Rudolph Day (a bit early)

I decided to combine all my cards this week for Pixie's Snippets Challenge.  It saves Di time, I hope, as she only has to visit once.  I am also going to link them all into the Rudolph Day Challenge tomorrow (Mr Linky is not up yet, but we are out tomorrow so I need to get them ready). 

All these cards are from partially done, just started, just printed UFO's and other bits.  The first one is of a little girl which is from a series of pictures I found on the net somewhere (I apologise but I have no idea where I found them - if anyone recognises them, please let me know and I will give the credit where it is deserved).  I spent a bit of time on my graphics program, creating a decoupage sheet for them. It did take quite a while but I do love them.  This is one sheet already printed and partially cut out, and the white base card is from the already creased and folded stock I have had for years. 

I am going to apologise for the photos this morning.  they were done in really good daylight and came out either slightly bluish or slightly pinkish.  Could have something to do with the fact that the battery warning was flashing all the time I was using it.

The next two cards are both from the same decoupage sheet.  The originals were designed by Gerri (Tich), Image by Annex.  I downloaded them some time ago, and sadly, I have lost contact with her.  She has done some beautiful sheets and like most crafters, she was very generous with her work, but had to cut back when she found others using her work and selling the sheets as their own.  The images are not as blue as they seem on these photos.  With the problems of sending thicker cards through the post, I found that I could achieve cards that I was happy with by dividing the sheet between two cards.  The sentiment is from a project I created for myself but they seemed to go, and fitted nicely into a snippets category I still have half a sheet of them to use up.

 These next two picture are of the same card, a waterfall design, also by Tich (Nov 2007).  I had converted this one and the robin cards to be cut on the Silhouette, so they were ready to use.  Easy peasy?  Oh no, it wasn't!  It is ages since I did a waterfall card and just looked at the component bits and thought "help, how do they go together?"  Fortunately, I keep a photographic record of most of my cards, so I was able to dig out one to study and it was easy from then on.   I do not trust the ability of glues to stand up against the working of this card, so I added a couple of brads to keep everything in place more firmly.

The next card is from a Crafter's Companion CD and was partly put together.  The main decoupage was done and all I had to do was to find the window sheet and alter it to fit to give it more life.  I sprayed the main decoupage with glitter spray to bling it up a bit - could not find anywhere to put gems this time.  I might go back and do some tinsel with a Quickie glue pen and glitter on the greenery along the top.  another time, I would also put glass in the window by backing them with acetate.

The last two cards are from Joanna Sheen's Thomas Kincaide CD, again both started in some way.  The one on the left is something I have not done before, being decoupage in strips, while the other is a more traditional decoupage.  I do like the Thomas Kincaide images, even if they are rather chocolate box -ish.   He really does paint with light. and they need very little embellishment.

When I have posted this, I am going to settle down and cut out some more of my many decoupage sheets, cluttering up my room, so that when I go back upstairs I can put them all together.  Apart from the ones in the UFO box and the snippets box, I have three folders full of them.  I need their space, especially as most of them are on the computer anyway.

When we get back from the birthday party tomorrow, I will try to get round everyone to see what you have all been up to.   Have a good week, all of you, and thank you again, Di, for hosting us and keeping order at registration.

PS. all the stuff used in these cards is from scraps or UFO's, apart from two pieces of Centura Pearl card (and that is not new)  so it fits into the UIU in 2012 ethos, too.


.


Wednesday 22 February 2012

WOYWW - 142

Happy WOYWW to you all, hosted by the very hospitable Julia.  When you have finished here, and you are welcome to stay as long as you like (your coats will be kept warm for whenever you want them),  if you head back to Julia's Place, she will show you the way to many more friends.

This is the first of rather a lot of photos this week.  Sorry they are a little dark, but I forgot to take them when the sun showed itself briefly.  This is what I am currently working on, yet another UFO from my "projects to finish" box (I daren't show you that fir fear of causing mass heart attacks).  I seem to recall that it is a sheet from one of Joanna Sheen's cd's.. 

If I pull out a little, you can see more of my desk - fairly tidy today.  In fact the surface had to cleaner down as well to get rid of the residue of plaster and brick dust from putting up various things on the wall.  My Ottlite (I love that) means that most of my night time photos are still not needing flash.    You can see a couple of the cards I have done this week- but more of those later.

  Now you can see the clock that has been falling over on my desk for weeks - now it is hanging safely on the wall, and out of my way.  Just below it is the big cork board, and a chunky piece of wood holding that up.  That means that I can hang the heavier items from that, and just leave the lighter stuff for the board itself.  You would not believe the number of things I have found that I thought I had lost - three separate craft knives., and several pairs of scissors.  My list of dates is up there and my heat guns and rulers.  They now all have their own place and can be seen and found easily.  all that is to the left of my working desk proper.


Straight in front of where I sit is now this smaller board, half cork board and half white board.  You can also see my kitchen roll is now off my desk but still well in reach.  In fact, it is easier to get at than it was before.  Yet more space to fill on my desk.  I think all my tapes will still stay where they are unless I think of something better one of the days.


 This is one of the many sheets of decoupage I found in that projects box.  This will probably become the 1st birthday card for our youngest granddaughter next month.  I still need to do the insert so I really must find out which CD ROM it came from  and match it up properly.  It is a cross between decoupage and invertage, but it seems to work quite well.  For once, I used all the layers and put them together with silicone glue so it is easier to get the shaping for the creature.
 Another from the same box, already printed out from Debbi Moore.  I do rather like this CD and the images are so easy to glitz without going over the top, with the glue pen and a light dusting of Martha Stewart glitter. 
 I kept the front panels really plain, with just a few dots of glitter to catch the light. 


If you are still with me, I must also say that these cards and one or two others hidden from view for the moment were made using mainly bits and piece already partly put together.  It was all from things I already had, so I am sticking to my pledge to use things up, and make the most of what I already have.

Now, as you wander off to visit others, I may meet you again as we visit all our friends.  have a good week, and see you again soon.

Monday 20 February 2012

Leap Year Birthdays

I have two very special birthdays to cater for this month.  My DH has his birthday on 29th February, so he only gets one official birthday every four years (mind you, he does celebrate on 28th February and 1st March on the intervening years).  Not only that but his niece also has her birthday on 29th February, and this card is for her, for her official 8th birthday.


You may remember this card but in a slightly different configuration in an earlier post.  I did it for the Less is More Aqua Challenge., but when I came to actually use the card, I wasn't totally satisfied.  So I managed to peel off the butterfly and replaced it with an "Elizabeth" flower, finished off with an aqua gem in the centre, and a few more gems in suitable places.  I like it much better now. For those who saw it on the previous post, the flourish on the front is die cut, using the Silhouette Cameo.  In fact, it is three flourishes placed together.

For the insert, I used a flourish from My Craft Studio, and coloured that and the writing to match the front of the card.

I am much happier with the card as it is.  It is still clean and unfussy, but has just that little more of what I was aiming at.  Hope you all have a great week, doing what you want with plenty of input from Mr Mojo.

Saturday 18 February 2012

Pixie's snippets challenge

 These were all finished in a big rush this morning and they are for Pixie's Snippets Challenge.  I can't remember if I told you about the other box I peeked into the a couple of weeks ago.  It gave me a real fright.  It was stuffed full of projects to finish, and projects that had never been started - scary!  These cards today are the product of a very short time this morning to put them together.  At the moment, there are no sentiments on them as I have no idea who will get them in the end.    These baby tigers I think came from a decoupage sheet downloaded free from a very generous crafter.  Sadly, I cannot remember who,  but if it is you, thank you, and remind me where I got these baby tigers.

This is another partially done card.  Most of the decoupage was complete, just needed a little tidying up, and mounting.  The dark bit at the top is not the card but the background against which it was standing.  The image is from the Crafters Companion CD ROM's of the original Flower Fairies, which I personally think are the prettiest fairies anywhere.

 Again, I must apologise for the rotten photography and the dark bit at the top.  I am not sure if you can make it out from the photo, but this is a decoupage.  I took the photo of a friend's dog, and then broke it down into layers, and then put them back together.  Even the fence at the back is cut, originally by hand - very intricate for a blade.  However since then, I have taken the time to convert it to a printing and cutting file for the Silhouette, which does the job beautifully.  The original was done as an A5 card for the owner, but I have also reduced it now for a smaller card, which is what this one is.  I do like using my own photos where possible.
 I started this card some time ago, but never got round to finishing it.  Another cutting file from the Silhouette, taking a whole sheet of card to create the cut out and the main card as one..  It also cut the slits round the edge through which I threaded the red ribbon.  The red you can see behind the heart is a piece of red wrapping paper glued to the back of the front, and then I just threaded the three red roses through the lattice to finish the card off.  I think I might also enter this one into this week's Less is More, which is for Punches or Die Cuts.  I am hoping that the Silhouette cutter does qualify as a die cutter.  It is a very clean looking card, I think, and a style I like. 
 My last two cards are also from the to finish box.  I started playing around with invertage and pyramage but I did decide that it was not always a good way to show off pictures.  This another of my own photos, taken a few years ago at Marwood Hill Gardens in North Devon.  If you even get the chance to go, take it.  No matter what season, there is always something to look at.  This visit was about ten years ago, when they were just starting to plant up the opposite hillside with young sapling.  Those saplings were huge when we went again last year.  It is a place to visit again and again.    The invertage on the right is straight, but taking the picture at night it looks so cock-eyed. 

Hope to get round to see everyone this week.  There were some stunning cards in the playground last week.  Looking forward to seeing you all tomorrow.  Thank you for hosting us all, Di, and for writing such an entertaining weekly report.

Wednesday 15 February 2012

WOYWW 141 - where is this year going to already?

Not a very productive desk to show you today, just a pile of bits and pieces.  There is a vey good reason for this as my DH is about to put in a couple of alterations to make life a little easier for me, up the left hand end of the wall.

The far end was never finished when my room was done, partly because we could not decide the best use of that piece of wall.  After I said what I wanted, the technical department decided how to do it.  After painting the remainder of the wall, there will be a large cork board to stick notes to myself, with a solid piece of wood for cup hooks so I can store my heat guns, brayer, steel inlay rulers and a few other bits that I can never find when I want them.  Above that will be the clock you can see falling over on my desk at the moment.  I am also looking for a new kitchen roll holder to put on the wall.  I tried the desk standing variety, which looks good, but it always results in kitchen roll lying all across my desk so that I can reach the end without getting up.  I am still looking for the one I want so you will have to wait to view that as well.

This card is one I started as a possibility for the Less is More challenge, and you can see it in the previous photos.  However, I looked at it for 48 hours and decided this morning that the stripes had to go, so I chopped them off.  I think that looks better, but I am still not happy.  I may chop it further, making it into a topper and edging it better or just bin it and start again.  The stamps are the mini village from Clarity, with a few little people added in freehand - I know, I need more practice at that..   

Come on folks, help me, do I leave it as it is, chop it into a topper, or bin it?  Your opinions would be gratefully received.

Having read Julia's post today, I agree that it is easy enough to remove the Word Verification, and leave in place the other tool which allows you to vet all comments before they go live.  In 18 months, I have only had one problem, and that was a perfectly safe and good comment ended up in the spam box.  It was easy enough to pull it back and post it.  If anyone want to know how to do it, I am one of the closet geeks that Julia was talking about, and can email you the details and do what I can to help.

If you have got this far, well done and thank you, but it is now time you moved on.  I have warmed your coat for you, and your gloves and scarf are on the radiator too.  So off you go to join all the others in Julia's living room.  She may not have wine and nibbles ready, but she is a great hostess making it easy for us to wander round and chat to all her other visitors.  Thank you  Julia.

Monday 13 February 2012

Less is More - One layer with stripes - Card 3

This is my third go at this week's Less is More challenge, using stripes.  To me, this card has not photographed very well, but I hope you can see it.  It is a basic hammered white card, which has gone a bit blue in the photographing.  I might try to redo that again in the morning if the light is better.

The stripes this time have been embossed with gilding flakes.  You dare not even breathe while applying those, they just fly everywhere.  The stamps are a set from Barbara Gray's Clarity Stamps.  The rose was coloured with my beloved Derwent watercolour pencils.  (I have always loved crayons since I was tiny, but this set beats them all.  I take a set with me on holiday as they fit very nicely into the caravan.)    It is not obvious from this photo that I have used crystal glaze over the top of the rose to seal it.

Hopefully, I might get more ideas on how to interpret stripes, so you may see me back again this week.  Who knows?  In the meantime, thank you to all those who have visited me and left such lovely comments.

Sunday 12 February 2012

Less is More - One layer with stripes - Card 2

Having panicked when I saw the challenge this week, this is my second entry in two days.  It is partly inspired by a beautiful lilac card by Di, which got me started.  I have a file of stripy papers in different colour, so I digitally cut a square from that, and created four squares from that.  I turned two of the squares, arranging the four in opposing corners of the card.  In the centre is a circle, also cut from the same paper, then slightly swirled.  The gorgeous lily on top of that is from a My Craft Studio CD, which is an image I really love.  The sentiment in opposing corners is matched perfectly in colour with the centre of the lily.

 Now my brain is working, I shall have a go at something non digital for later in the week, so I may see you all later.  I still have not looked at anyone else's cards, other than the people who have visited me, but I will wander round later in the week.

Saturday 11 February 2012

Less is More - Week 54 - One Layer and Stripes

Having gone into panic mode over stripes, my mojo suddenly bounced back, and this card appeared.  The flower is a surfinia cut (digitally) from one of my own photos, and then added to the design page in My Craft Studio.  Before I added the stripes, I embossed the flower to give it some texture.  Then I added the sentiment to match to match the stripes before printing the whole thing out.

Friday 10 February 2012

Di's Playground - Snippets Challenge

 These three cards are for the Snippets Challenge in Di's Playground this week.  This one came from a photo I found lying around, and I converted it into decoupage by working out all the different scenic layers.  It is one of the many sets of decoupage I cut out ages ago, which ended up in the to do box (I have dozens more of these things).   I think the photo was taken in the Peak District - we went up there for the week before our son's wedding up there.  I quite fancy going back and having a look at some of the things we missed.

This second decoupage was a photo taken (with permission) from the brochure of the nursing home my mother was in before she died.   I apologise for the quality of the image, done in a bit of a rush on the phone.  This one had been originally cut with the Silhouette - did you know that you can put your decoupage into the Silhouette and adapt it to print (on your printer) and then cut automatically.  This one does need a little adjustment to tidy it up.  Originally, I had done quite a few of these and took them down to the hoe to sell for funds to buy extras for the residents.  This was in a batch I found when I was tidying up, hidden in the to do box.  The border, in particular was a nightmare to get right., but they all sold very quickly.  When I have done the last few, I shall take them down and leave them there for them to sell again.  I do find I keep looking at  scenery photos to see how they can be adapted for decoupage, as well as altered in other ways.

I was so impressed with Elizabeth's flowers, I had a go at these.  Heart flowers are so good for using up snippets of paper and card, and a few gems to finish off.  I did not use quite the same method as Elizabeth - there is no backing circle to glue them to, but they seem to be holding up all right.  The papers are some I have had in a file for ages, and were downloaded free from somewhere, but I cannot remember the site at the moment.  There were hundreds of beautiful papers there - another lot of stuff to go through to use.  Oh yes, the ribbon was from a band round a set of pearlescent cards - it does not show up too well in this photo, but it is there, honestly.

The more I sort through my room, the more snippets and things I find, all ready to be used up.  I keep finding bits of ribbon, and scraps of pretty paper and card I could not throw away.  All these papers are on the computer anyway, so it is time I used up the ones already printed - saves space. 

I am looking forward to wandering around everyone's snippets to pick up new ideas to just to gasp in admiration at what you have achieved.  Can we play hopscotch this week, please, Di?  anyone want to join me?


Less is More - week 53 - Colour challenge - Aqua

The Challenge this week for Less is More was to use the colour Aqua.  I don't have too much in that colour, but I did find some pearlescent paper.  Then out came the Silhouette to cut these flourishes.  when I came to peel them off the cutting mat, they went into a mad frenzy of curling and twisting, so I did wrestle them in between two heavy layers of paper for the night.   

After I got them safely on to the card, I added a Silhouette cut butterfly, and a printed sentiment.  I did try colouring peel offs for the sentiment, but the texture was wrong, so I went back to the simpler option of printing it.  There is no way, I could have cut those flourishes by hand, and the Silhouette did such a good job. 

Hope everyone else enjoyed this challenge.  I have seen one or two but I hope to get round to see a few more. 

Wednesday 8 February 2012

WOYWW 140

Good morning folks, well just about morning as I write this.  I thought I had better get myself sorted out a little earlier this week. 


My desk has been completely clear for two days, but not now.  It is now full from end to end, but at least it is fairly productive.  I have had a play with stamping and brayering - I will show you that one when I have finished.  Now you can see my beautiful Silhouette Cameo in pride of place, linked up to the computer.  So far I have done some fairly intricate flourishes, ready for a card for later in the month.  At the moment, they are tucked under a pile of paper to flatten them out before I try to mount them.  Once I have peeled them very slowly off the highly sticky mat, they do seem to have a life of their own for a while.  Hopefully by tomorrow, they will have relaxed enough to work with.  They are just so pretty and delicate and there is no way on this earth I could cut those by hand.

Even my floor has had a clear up and a good vacuum.  Where do all the gems go to, you know the ones that fly off when you are trying to place them carefully on your card?  None of those turned up.  However, I can now actually put my legs under my desk with reasonable comfort. 

If you turn to the left of my desk, you can see my two boxes, one of snippets and one of paper that I am desperate to use up.  I think It might take quite a while though, don't you agree? 

As it is now well after midnight on Wednesday, I am off to bed, but I hope to get round to see as many of you as possible when I get up again.  I am sure you will enjoy all the other desks on show this week at Julia's Castle.  Look forward to seeing you all.  Have a good week.

Friday 3 February 2012

Di's Snippets Playground - reporting for registration

 These first two cards for Di's Snippets are bits I rescued from the Less is More challenge for this week.  It took me four attempts to get it right, and I did promise that I would use the bits from those to make other cards.  Well, here they are.  I cut the rose from the centre panel, and the larger coloured panel, and just put the rose on top of the coloured bit.  A simple peel off from stock finished them off.  Nothing bought specially and nothing wasted.

This one is also from bits left from making another card, which you can see in an earlier post.  The image is one of the small ones from Debbi Moore's deco ladies.  I just cut it out, and matted and layered it onto toning pearlescent card.  Then I glitzed it a bit with a Quickie glue pen and Martha Stewart glitter (although that does not show on this picture (it is there, really). 
This final card was actually made for the Allsorts Challenge, but as it was made up of bits from various boxes  and ring binders (that is where I store my peel offs - well most of them anyway)  The red glitter card needed a good scrape to allow the glue to get a good grip, and I wish I knew where I got that sort of hammered finish of mirri card, but I have had it far too long.  The butterfly and the little flowers were peel offs stuck onto acetate, then infilled with Sakure pens. 

I think that is all I have to show this week, as I have got stuck into another major tidy up - don't collapse, but I can see my desk from end to end.  I just need to work back from my desk to the door now, and vacuum up all the glitter and gems that fly everywhere.  Looking forward to meeting you all in the playground this week.

Ditzy-craftymess - Anything goes (new challenge blogs first challenge)

This is a card I am entering into the first challenge of the Ditzy Crafty mess.  The rules of this first challenge is Anything Goes.  The main image is from Debbi Moore, one of her deco ladies.  I have used this image before in a more elaborate card, but with glitter.

This time, I was in the mood for a more keep it simple style, so it is mainly matting and layering with toning pearlescent card, and then adding the pearls to embellish the lady.  I have not yet added a sentiment as this card is going into my stock box for future use, and the sentiment will be added at that time.  The base card is actually black although it does not quite look right in this light.  I meant to take my photos this afternoon in the bright sunlight, but I forgot, sorry folks.

As this is the first challenge, I want to wish everyone good luck and to say thank you to those who thought it up.

Quirky Crafts Challenge - Make a scene

This is a decoupage card and I am entering it into the Quirky Crafts challenge to Make a Scene, very different from my usual scene cards (which are stamped).  I cannot remember which of the Crafter's Companion disc it is from, as I cut the pieces out and filed them into my projects to do box.  I am glad I had already got them cut as I do remember that they were horribly fiddly.  Putting them together this week was the easy part.  

As you can see from these photos, there are a lot of elements to be added to the base card, one gate and the fence (two sided), even one of the characters is two sided.  I did find it hard to match up the two sides of the gate and the fence, and then to add the little rabbit peering through the gate.


All the bits of decoupage is first curved slightly before being added to the picture, to give it more realistic dimension.  I have not done much decoupage recently, but I think I will be doing much more to use up all the things I have already cut out.