One minor gripe I have with My Craft Studio is that it does not handle pdf files. This may not sound very interesting but when you have a lot of discs where all the images are in pdf form and you want to manipulate one of them to create a different format, it can be irritating.
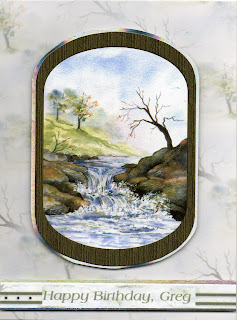

I have got round this problem using another program to convert the pdf to jpg format. For this card, I took the image and the insert from the latest Joanna Sheen / Pamela West CD, and copied them into Roxio Photosuite, then saved them as jpg's (make sure you know where you have saved them to on your computer - you can waste hours trying to find missing images). From there, I was able to then take them into My Craft Studio, and resize them to suit my needs. The image on the front is as designed by Pamela West, cut out and mounted onto holographic card, and then onto the backing paper. The insert was resized to fit the card I had, then I digitally punched out an oval, into which I put the text. With My Craft Studio, you can match the colour of your text to any part of your design. I picked the darkest part of the twigs, and then darkened the text a little from that to make it stand out but still tone in well. To get the sentiment strip across the front of the card, I cropped the insert to keep just the section with the vertical lines, then turned them through 90 degrees to go across. I found that I could not get the text to show up satisfactorily on that background, so I went back to the insert and cropped out a small section of the main background, and digitally placed that on top of the strip with the lines, put the text on top of that and printed it as one complete image. Both the image and the sentiment strip were mounted on the card with narrow shaker tape to give some dimension. This card was to be given by hand so I used the thicker shaker tape, but if it was to be posted, you could use the thinner tape, or just design the whole thing digitally and print it out as a flat design. I did this initially to assess if the end result would be as I wanted. Doing it on the computer first saves using expensive ink printing things you really don't want in the end.
I thought this particular design from Pamela West was a good one for a male card, always a problem to sort out, especially if your subject is not too keen on sports or cars.


No comments:
Post a Comment